Once you've created a table-to-table relationship, you may find that the reference field doesn't show the information you want. For example, when you display a record or report, the field may show the Record ID#. You may want to show more meaningful information, such as project name or company.
Numbers may be shown in reference fields because Quickbase typically uses the parent table's key field (such as Record ID#) to link the tables together. But, you don't need to use the reference field in reports and on forms. Instead, Quickbase lets you designate a reference proxy field. Use this feature to specify that another field, containing more user-friendly information, should look and act like the reference field when you create or edit a child record.
For example, instead of Record ID#, use the Company Name field. You then use this reference proxy field in reports and forms instead of the reference field. You can still use the field to select values from a parent table or to access the parent record.
If you add at least one lookup field to your table-to-table relationship, then that field is designated as the reference proxy automatically. But you may need to add or change the reference proxy field settings for a table-to-table relationship in your app.
You designate reference proxy fields within the properties of the relationship's reference field, in the child table.
Before you start, the child table needs to include at least one lookup field, which includes data from the parent table, or at least one formula field, which could also include data from the lookup fields, as these field types are included as choices for the reference field proxy.
Tip: You can create a formula field that combines values from lookup fields, then you can select that formula field as your proxy field. For example, you may want to combine a project manager first name field and a project manager last name field into a single entry.
To designate a reference proxy:
-
Access the field properties of the relationship's reference field, either by editing the relationship or opening table settings.
-
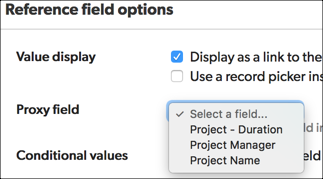
In the Reference field options section, click the Proxy field drop-down and select the field you want.

-
Click Save in the upper right to save the field properties.
-
Add the reference proxy field to any additional reports and forms.
-
You may also want to review the record picker settings for your tables, to customize the values that appear in your reference proxy field.