There may be times when you want to display a list of choices for a particular field in several different tables or even across separate apps. For example, you may have a list of status choices ("started", "on hold" and "complete"), all of which apply to Projects and Tasks. Or maybe you'd like to take the list of cities that customers entered in one field and make it a drop down list of choices in another field.
A shared value field allows you to take values from a text or numeric field and make them available as a drop down list in another field. You can even do so across apps, if you want. This feature not only eliminates the need to manually type in values for each record, but also makes it easier to maintain the list because you make updates in only one location, not in separate tables and applications.
What a shared value field is
Use a shared value field when you have several different tables or apps that need to access a list of known values unavailable elsewhere, such as Statuses, Project Phases, State Names, or Categories.
A shared value field isn’t recommended when you need a list of acceptable values entered into a Text - Multiple Choice field. You should use the “From list” input type instead.
Remember, it is preferable to use a relationship to populate a drop down list. For example, don’t use a shared value field to populate (for example) a list of customers drawn from the Customers table. Instead, create a relationship between the tables. When you do so, the relationship's reference field becomes the drop down list of choices. (Read more about relationships.)
Create the source list
To create the source list:
-
Open or create the application where you want to create the list of options.
-
Create a new table and add a field, or find an existing table and field you're interested in using.
-
Click Settings, then click Fields. This field must have either a Text (but NOT a Text - Multiple Choice) or Numeric field type.
Note: You cannot use a List - User or Multi-select Text field as the source of a shared value field.
-
Within this table, create a new record for each choice that you want to appear in the list.
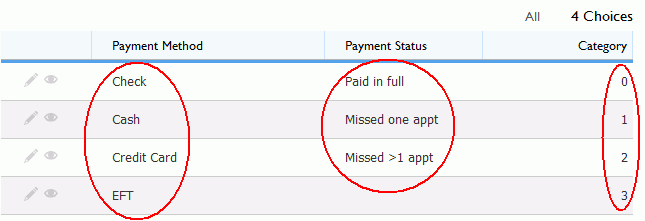
To check your work, click the table name and select List All. You should see a list of all the choices you have created. In the Choices table below, values for three shared value fields are shown: Payment Method, Payment Status, and Category. The values shown for each field can appear in multiple tables and applications -- follow the directions below to see for yourself.

Share the field containing the source list with other apps
If you are planning to make your source list available to other apps, you need to name each app that you want to access it.
To allow a field to be the source for a shared value field:
-
Near the bottom of the field Properties page, locate the Shared values option and turn on the checkbox titled Values from this field may be a source for dropdown lists in other apps.
Note: If this field is already shared with existing applications, those applications are listed here instead of the checkbox.
-
Click the Add App link. Quickbase displays a list of applications to which you have access.
-
Click the radio button to the left of the app that you want to have access to the values in the field and click OK. The application you chose appears below the Add App link.
-
If you want to share the field with additional applications, repeat steps 3 and 4 for each one.
Configure a field to display a list of shared values
To configure the field that should display values from the source list:
-
Open the application in which you want the source list to appear.
-
From the table containing the field you want to configure, click Settings in the page bar, then click Fields.
-
Open the field's Properties page by clicking on its name.
-
Within the Text field options section of the properties page, locate the Input type option and select From another field.
-
Click the Select shared field button that appears to display a list of applications you can access.
-
Click the radio button to the left of the application that contains the field with shared values you created in the previous section and click OK.
A list of fields within that application opens.
-
Select the field that contains the values you want to display in this field and click OK. Quickbase displays your choice.
-
Select how you want to sort the items in the list, and then click Save.
-
If you want the items in the list to be arranged alphabetically, select Display choices in alphabetical order.
-
If you want the items in the list to be arranged by record number, select Display choices in the order shown here.
-
-
Click Save on the Page bar.