The most common and recommended method for creating conditional dropdown lists is using the three-table model. You can, however, design conditional dropdowns using another method:
-
The conditional dropdown is created based on the relationship between only two tables
-
Both tables must contain the field upon which the conditional dropdown depends.
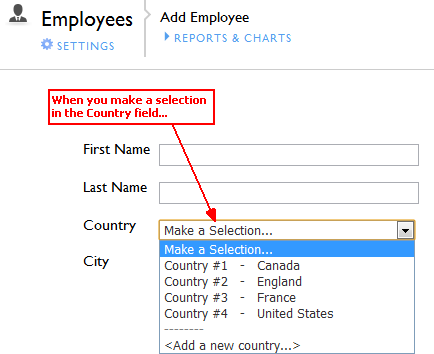
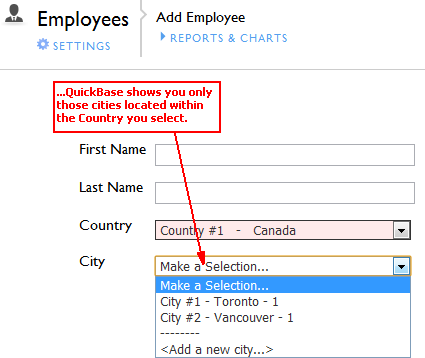
So, to achieve this result:
 |
 |
...you would need to create these two tables:
-
Employees
-
Cities
Both the Employees and Cities tables need to include a Country field AND it's important that the values in these fields match.
When would I use this approach?
You might consider taking this approach when it's your practice to import data to maintain the field upon which the conditional field depends. For instance, if you want to maintain your parent Countries list, you could choose to:
-
Create a table and a record into which you can import a list of countries
-
In the Employees and the Cities table, make sure the Country field is a shared value field that uses the table and record you created in the previous step as its source. This ensures that your list of countries will always be the same.
Drawbacks to this approach
While it can certainly work, this approach is a bit more error-prone than the basic three-table scenario. The two-table method requires that you keep the "duplicate" field in both tables entirely in synch. If you choose not to implement the shared value recommendations above, you must always remember to update the country list in the Employees table when you update the country list in the Cities table.
Tutorial: Creating a conditional dropdown using a two-table relationship
Follow these steps to create a conditional dropdown, based on a single relationship between two tables. Note that, in this example, we're also creating a third table, only to hold the parent list of Countries.
Step 1: Create an application with three tables
Create the two tables and fields shown in the table below:
|
Table |
Fields |
Description |
|---|---|---|
|
Employees |
|
You'll record all information about each employee in this table. |
|
Cities |
|
Use this table to store the names of all country and city pairs. |
|
Countries |
Country |
This table holds your parent list of countries |
Step 2. Import or enter your countries
Add these records to your Countries table (either manually or by import)
-
Canada
-
England
-
France
-
United States
Step 3. Configure your shared value fields
In the Employees and Cities table, edit the Country field properties. For the source of these shared value fields, select the Countries: Country field.
Step 4. Create a relationship between the Cities and Employees tables
Your Employees table needs to have access to the city and country pairs in the Cities tables so that you can specify the appropriate city and country when entering an employee record.

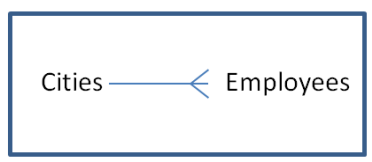
The relationships should be set up this way because one city has many employees
Reference and lookup fields in the details table
Once you've created this relationship, you should see this reference field in the Employees table:
|
When you create this relationship... |
...Quickbase creates these reference fields in the Details table. |
How these reference fields help you create conditional dropdowns |
|---|---|---|
|
Cities -< Employees |
Related City |
The Related City field in the Employees table is your conditional field. Having this field in the Employees table lets you associate each employee with the right city. It also lets you set up conditional behavior that allows you to specify that Quickbase should check the selection of the employee's country and then filter the Related City list accordingly. |
Quickbase also creates a lookup field in the Employees table when you create this relationship:
|
Lookup field |
Description |
|---|---|
|
City - Country |
The City - Country lookup field in the Employees table gives Quickbase access to the City/Country pairs in the Cities table. (You can see that the City - Country field contains the values in the Cities: Country field.) While it's important that this lookup field exists in the Employees table, you'll want to remove it from your form later. |
For now, just make note of the reference fields that Quickbase created. You'll use these later in the process.
Step 5: Enter your Cities
Populate your Cities table as follows:
|
Cities |
Countries |
|---|---|
|
Canada
|
|
England |
|
Paris |
France
|
|
United States |
Step 6: Set Conditional Behavior properties for your conditional field
Remember that your goal is to create a form where you can enter employee information and be able to filter the Cities list based on the employee's country. You can see that your Employees table now contains the reference field Related City--this is the field that you should define as conditional.
To set the Conditional Behavior property:
-
Access the field properties of the Related City field in the Employees table.

-
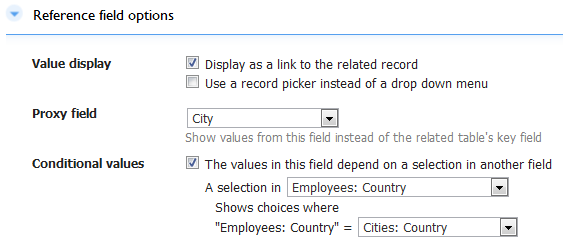
Check The values in this field depend on a selection in another field. (Note: You'll see this option only in the field properties for Reference fields; if you don't see it, you may have chosen the wrong field by mistake.)
Quickbase asks you select fields to complete this statement: A selection in <field1> shows choices where <field1> = <field2>. -
Set these conditions:
-
In the first dropdown, select Employees: Country. This tells Quickbase to check the value of the Employees: Country field to determine which cities to display.
-
In the second dropdown, select Cities: Country. This tells Quickbase to display only those cities that belong to the country the user selected.
-
Click Save.
Cleaning up your Employee form
Depending on the order in which you created your relationships, your Employee form may contain an extra field (City --Related Country). If this is the case, simply edit the form properties and remove the field from your form.
Testing your conditional dropdown
Once you've completed these steps, you can test your conditional dropdown by adding a new employee, Colleen Garton, to your Toronto office.
To test the conditional dropdown:
-
From the Employees table, click + New Employee on the page bar.
-
Enter Garton and Colleen, for Last name and First name, respectively.
-
In the Country field, select Canada.
-
Click the Cities dropdown. Quickbase displays only Canadian cities: Toronto and Vancouver.
-
Select Toronto and click Save.