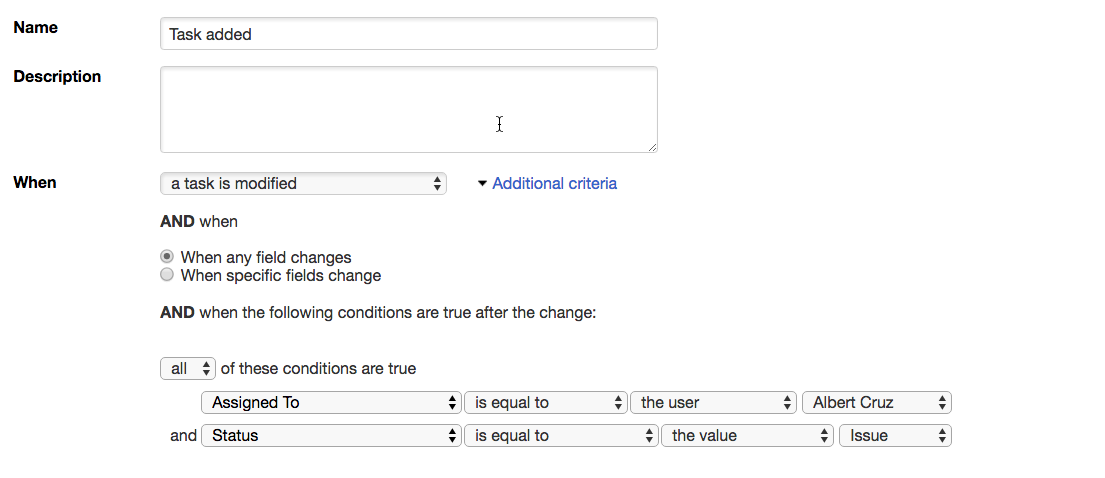
To define a webhook, provide the following:
- Your Name and Description for the webhook.
- The When, including the Quickbase event that will trigger the webhook, and any optional filters.
- The Then, which defines the webhook message, including the target URL, headers, and body/payload.
The following section provides more details.

- Provide a name and description:
- Name -- enter your name for the webhook. Quickbase uses this name to identify the webhook. This name will also appear in the list of webhooks on the Summary Page.
- Description -- Describe briefly what the webhook does. This information does not appear anywhere else.
- Define a trigger for the webhook in the When section.
- When -- Select any combination of table events that will trigger your webhook. The possible events are when a record is added, modified, or deleted.
- Use the Additional criteria link to add additional filter criteria that must be met before the webhook will fire. The filters can be based on the affected fields, and also on the values of fields after the change event. If so, use the Additional criteria link.
Add additional criteria:
- Click the Additional Criteria arrow to the right of the When drop-down box.
- AND when -- Select one of the following options:
- When any field changes – Trigger the webhook regardless of which fields changed.
- When specific fields change – Opens a list of fields that you can select. The webhook will fire only if at least one of the selected fields has changed.
- Under the second AND when option, you can create filter criteria, which must be true after the change event.
In the above example, the webhook will fire when all of the following are true:
- A record is modified
- Any field has changed
- The Assigned To field is the user Albert Cruz
- The Status field is “Issue”
Complete the "Then" section:
In the “Then” area, you define the actual webhook that gets triggered when the previous “When” conditions are met.
- Endpoint URL -- This is the location where the webhook message will be sent. If the webhook is going to another Quickbase table, use the URL for the target table. To find the correct URL, just click the Table icon you want to use to get the URL, for example:
https://myApp.quickbase.com/db/bmehtz?a=td.
Remove the string "?a=td" at the end of the URL. So, the Endpoint URL you should use is:https://myApp.quickbase.com/db/bmehtz - HTTP method -- Quickbase webhooks supports five HTTP methods (POST, GET, PUT, PATCH, and DELETE), but most webhooks will use the POST method (which is the default).
- Message format -- either XML, JSON, or RAW, as specified by the documentation for your webhook target. If the webhook is going to another Quickbase table, use XML.
- Message header -- Enter a list of up to 10 name/value pairs, as specified by the documentation for your webhook target. Typically this will further describe the format of the message, for example: Content-Type: application/json. If the webhook is going to another Quickbase table, provide the API call name either here or in the URL, for example: Quickbase-Action: API_AddRecord.
- Message body -- This is the payload of the webhook message, typically in XML or JSON format. See the documentation for your webhook target for specific requirements. Payloads sent to other services will be encoded as UTF-8. If the webhook is going to another Quickbase table, consult the Quickbase API Guide. For any Quickbase API call, use the Sample XML Request as a template for your message body.
Warning! Webhooks can be edited or copied by all admins in the app. Any user-specific URLs or credentials you enter will be visible here.
Add field references and markers
The Endpoint URL and Message body may also contain Quickbase field references and markers. Choose these from the dropdown that appears to the right of the field. For example, an endpoint URL that contains a marker might look like this:
https://myApp.quickbase.com/db/%dbid%
For more information on field references and markers, see Markers and field references and Create Custom Messages for Email Notifications.