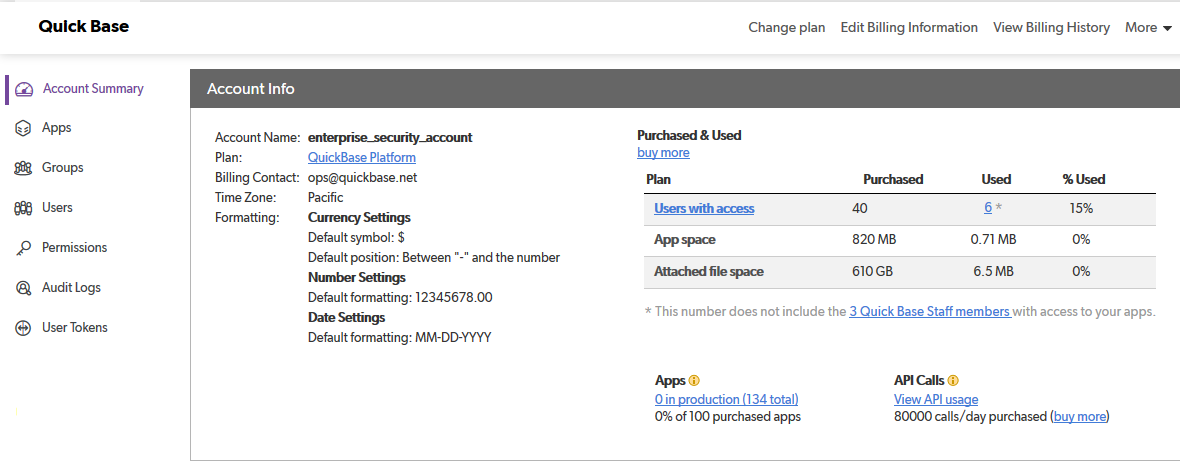
You can track and manage your billing account on the Account Summary page of the Admin Console.
To open the Account Summary page, select Manage billing account from the user drop-down on the top right side of the page.
Note: Only account admins will see this link.

The Account Summary page contains the following sections:
Account Info section
You can perform these tasks:
-
View your plan details. To review details of your service plan, click its name.
-
Change your plan. To change your service plan online, click Change plan at the top of the Account Summary page.
-
Change your billing information. To update or change your billing information online, click Edit Billing Information at the top of the Account Summary page .
-
View your billing history. To review your billing history online, click View Billing Information at the top of the Account Summary page.
-
View account usage. Under the Purchased & Used section, you can review your allocated space and user allotment usages. If you are close to or exceeded any of these limits, click the buy more link to upgrade your service plan, or reduce your usage.
-
View application and file attachment usage. You can review the total application and file attachment usage statistics for your plan. If you need to reclaim space, you can delete file attachments.
-
Access and manage apps. From the Apps section, click the number in production link to open the Apps page.
-
View and manage API calls. From the API Calls section, click the View API usage link to open a daily usage chart showing the number of API calls made in the last 30 days. To add more usage, you can click the buy more link to upgrade your service plan.
More menu
From the More drop-down menu at the top right of the page, you can perform these tasks:
Edit account properties
To edit these account properties, click the More menu, then choose Edit Account Properties.
Allow Public Apps. Allow app admins to grant anonymous access. Read more about sharing apps with Everyone on the Internet (EOTI).
Allow App Sharing. Allow app managers to share a copy of their app in the Quickbase Exchange.
Billing Contact Email Address. Enter the new email address in the Billing Contact Email Address field.
Time zone. Use the field to pick your account's time zone. To change the time zone, click Edit Account Properties and select the time zone from the Time Zone list.s
Prevent test as user. App admins can test as any user who has access to the app, with the exception of app managers and users who are also account admins. For more details, read Testing as a role or a user.
Formatting Defaults. Set the default currency, number, and date settings for your account.
Company Info section
From the Company Info section at the bottom of the page, you can perform these tasks:
-
View details about your company and account team. Review your company name and any email domains where Quickbase recognizes you as the owner. To view details about your account team, click the company name. You can review including the contact information for your Account Executive, Customer Success Manager, and Orientation Manager, as well as some training links.
-
Change the company name. To change the name of your company, click it. Then, click Edit Company Name and make the desired changes.
-
View or inform Quickbase of the email domains you own. When you own email addresses that belong to your users, you can control their Quickbase user accounts. If your company's email domain does not display in the Company Info section, you can request Quickbase to add it.